Easy Steps to Create a Bootable USB with Rufus - Windows 7,Windows 8 ,Windows 10
Rufus is a utility that helps format and create bootable USB flash drives, such as USB keys/pendrives, memory sticks, etc. It can be especially useful for cases where: you need to create USB installation media from bootable ISOs (Windows, Linux, UEFI, etc.)
Steps to create bootable Pendrive -
Step 1 - To make a bootable pendrive we need a software. Rufus is best for this work why ? because it small size software and works very well.
Download Rufus and Install it - rufus.akeo.ie
Step 2 - Open Rufus RUN it.
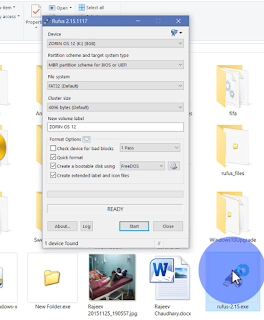

Step 3 - Now Select the device which you want to make bootable (It will automatically detect the device but if you have two attached pendrive then you can select a particular pendrive)
Now option #2 "Partition scheme and target system type" here select the MBR partition scheme for BIOS or UEFI (When you select the file this option some times changes or select extra things don't worry it automatically detect it its ok)

#3 Cluster Size choose default.
#4 New Volume Label you can name it anything you want (make sure don't use symbols)
#5 Format Options Make it same as shown in Image (By default it is selected)
 Step 4 - Now choose the file which you want to insert in pen drive Here are 3 Formats.
 Click on the Icon to Insert the file.
Step 5 - Now everything is READY to Click on START.
Step 6 - During the process window will open click on OK.
 Step 7 - Congrats you have created your pendrive bootable.
Now option #2 "Partition scheme and target system type" here select the MBR partition scheme for BIOS or UEFI (When you select the file this option some times changes or select extra things don't worry it automatically detect it its ok)

#3 Cluster Size choose default.
#4 New Volume Label you can name it anything you want (make sure don't use symbols)
#5 Format Options Make it same as shown in Image (By default it is selected)

- FreeDOS
- ISO Image (I have selected ISO Lubuntu )
- DD Image

Step 5 - Now everything is READY to Click on START.
Step 6 - During the process window will open click on OK.


0 comments:
Post a Comment